jetblue
Crossed Swords Squire


- Joined
- May 6, 2006
- Posts
- 186
hi,had some adventures with the neo cd toploader and thought id share.
first is the power on but black screen fix i posted earlier in the year:
http://www.neo-geo.com/forums/showthread.php?240188-neo-geo-cd-black-screen&highlight=
found many more neo cd's with the same thing but different shorted L filter diodes or whatever they are called. i think there's five of them,L1,L2,L3,L4,L5 in various areas on the board and either one of them shorted will give black screen. so if you have black screen check with a meter any of those filter diodes with an L in front of them. volt or continuity,power will not go thru it when checking if its dead.
second is the annoying clicking sound that many neo cd's have. its caused by a switch wich stops the laser in center. they tarnish or get dirty not allowing the switch to activate so the laser keeps trying to go thru the board. no idea what these switches are called or where to buy usually getting a whole new mechanism solves this but im cheap. ( i think the mechanism is HPC-1L,30 bucks on ebay)
usually the clicking lets you play the game but on some the clicking stops it or makes mysterious resets making the neo cd unplayable. the fix is a bit complicated but cheaper than buying a whole new mechanism.
you need to desolder the 2 blobs holding the switch to the mechanism but be careful not to melt the plastic:
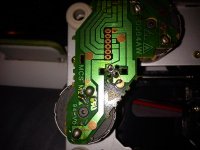
the plastic switch should just come off if not it has 2 tabs that you can untab with your finger
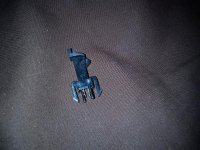
now thats its removed gently push the bottom part between the solder pins with something like a smalls screwdriver or toothpick and it will slide out from the top
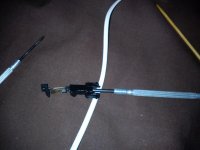
now that its released you can see how it works. just 2 strips of metal when pressed make contact
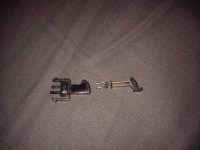
here you can see a small square or triangle that is the part that makes contact. it is black with tarnish and dirt not allowing electricity to go thru. you need some sandpaper or a needle to scratch it clean till its shiny.
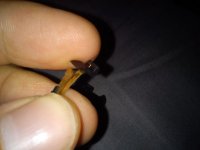
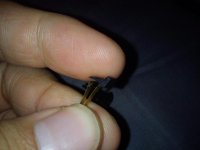
now that its its clean slide it back in gently,if you bent it a bit scraping off the crud bend it back to its original way. the engineers who made this were kind enough to make a slide hole so use a toothpick as shown to lock it back in place. you will hear a click when its in all the way.
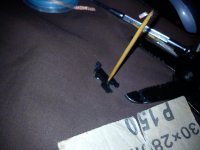
now that its all together put back on the mechanism and make sure to have the contacts completely surrounded by solder like before. it anchors it to the board more securely than the plastic tabs. if you only use a little solder the switch will wobble and wont work.
if it still clicks redo the scraping or if the switch wobbles make sure the center part of the switch with the 2 strips is in its plastic housing all the way till you hear the click.
done this fix many times and should last till another 20 years of tarnish and crud accumulates on it again
third fix is still in the works and maybe you can help. alot of neo cd pads loose the clicking sound of its d-pad switch and stop functioning all together. there is a metal concave thingy,i think the technical name for it is a tactile metal dome:
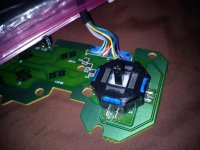
here it is removed from the switch
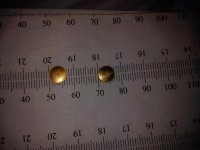
once it goes flat the switch is dead or extremely hard to activate.
ive ordered multiple switches similar to it and made prototypes:
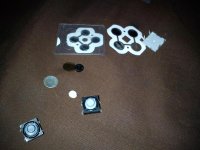
prototype worked but the click to press ratio was off so i resorted to buying tactile switches and harvest the metal from them as a replacement. there are none that have the exact same size but i found one that's 75% the size and its working but takes a bit more force to activate making the rhythm off a bit. to make it flawless i would have to replace all of the concave metal if they are working or not with the new ones to get it in rhythm. i also harvested the concave metal from nintendo 3DS and they didn't work at first being too weak but messed with it again and seems to be working at almost the same pressure as an original. i will continue testing and let you know the results later on.
fourth is an oddity. the protection inner shell is a weird material almost like bakelite than plastic. also it has unused pegs that can hold its laser:
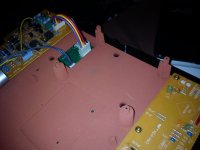
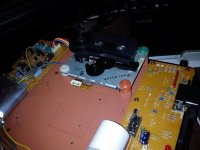
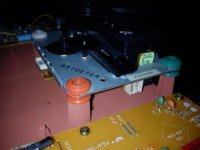
was it supposed to have been there originally? or perhaps an entirely different laser mechanism was meant for it cancelled due to costs but the mold was already made. that inner shell shouldn't even be there. such mystery.
i didn't mention pot tweaking for weak lasers as anyone can do this or region switch as there are plenty of tuts on it. here my simple region mod done with a radioshack slide switch:
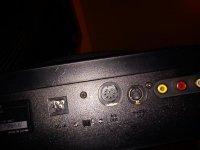
http://img.photobucket.com/albums/v238/jetbue7/IMG_20131001_134321_zps31e982ca.jpg
http://img.photobucket.com/albums/v238/jetbue7/IMG_20131001_134253_zps0ab75a22.jpg
i lost my notes on pot readings but will provide later on. if you have a weak laser just tweak the pot on the laser not the motherboard pots unless you suspect they have been changed.
update,found notes. i used a multimeter set to ohms at 200k. use the black led on the top prong of the pots and use the red to check the other 2 prongs. i say top as they are like a triangle. to lean what ohms your pot is for replacement put both black and red leds on the 2 bottom prongs and the reading is the full measure of how many ohms it has max. the mainboard pots have initials next to them probably indicating what they are. one has FG so i think its focus gain,TG tracking gain etc. you will see them when you take it apart. these are the readings for 2 units i had:
unit 1 pots
vr101 44.0 39.0
vr102 05.7 09.2
vr103 16.9 17.6
vr104 01.9 000
vr105 00.9 000
laser 17.2 04.5
unit 2 pots:
vr101 42.0 36.9
vr102 08.3 10.6
vr103 17.0 17.2
vr104 01.3 000
vr105 01.0 000
laser 14.9 06.0
if games don't load or take a while tweak the laser pot only shown here:
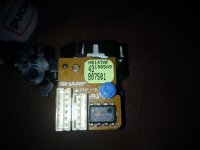
laser is a sharp H8147 i think,20 25 bucks on ebay.
the little blue pot. careful its fragile so use a small flat head screwdriver. you can take readings with it in the mechanism hooked up wont change the readings at all. same for taking pot readings from under the board where the 5 pots are.
http://img.photobucket.com/albums/v238/jetbue7/IMG_20131221_164350_zps919b4c5b.jpg
sometimes if the laser does read but has a hard time seeking and resetting after adjusting the laser ohm to like 20 or 25 then adjust the main board pots but as always remember what readings they were so if you have to you can set them back. usually i don't get to that point and just get a new laser.
forgot to ask,is there anyway to tell the difference between a USA and JP model? i found one where the owner has no idea where he got it. the metal jumper looks factory and semi clean but all the inside boards are stamped with this:
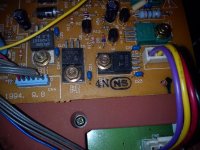
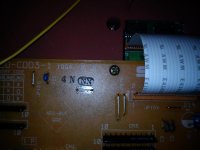
same on the motherboard.
even the ribbons look different from all the JP units ive seen:
http://img.photobucket.com/albums/v238/jetbue7/IMG_20131221_164203_zps9d167122.jpg
http://img.photobucket.com/albums/v238/jetbue7/IMG_20131221_164306_zps765fe1c9.jpg
http://img.photobucket.com/albums/v238/jetbue7/IMG_20131221_165452_zps8bf61f17.jpg
its serial is JA0042124
if anyone has info on how to tell them apart proof positive that would be most helpful.
hopefully il get a cdz and a front loader and provide fixes for these.
that's it. if you can add to it or link other threads that have past fixes as i cant find them. hopefully this will help many keep there neo cd's running for many years to come.
first is the power on but black screen fix i posted earlier in the year:
http://www.neo-geo.com/forums/showthread.php?240188-neo-geo-cd-black-screen&highlight=
found many more neo cd's with the same thing but different shorted L filter diodes or whatever they are called. i think there's five of them,L1,L2,L3,L4,L5 in various areas on the board and either one of them shorted will give black screen. so if you have black screen check with a meter any of those filter diodes with an L in front of them. volt or continuity,power will not go thru it when checking if its dead.
second is the annoying clicking sound that many neo cd's have. its caused by a switch wich stops the laser in center. they tarnish or get dirty not allowing the switch to activate so the laser keeps trying to go thru the board. no idea what these switches are called or where to buy usually getting a whole new mechanism solves this but im cheap. ( i think the mechanism is HPC-1L,30 bucks on ebay)
usually the clicking lets you play the game but on some the clicking stops it or makes mysterious resets making the neo cd unplayable. the fix is a bit complicated but cheaper than buying a whole new mechanism.
you need to desolder the 2 blobs holding the switch to the mechanism but be careful not to melt the plastic:

the plastic switch should just come off if not it has 2 tabs that you can untab with your finger

now thats its removed gently push the bottom part between the solder pins with something like a smalls screwdriver or toothpick and it will slide out from the top

now that its released you can see how it works. just 2 strips of metal when pressed make contact

here you can see a small square or triangle that is the part that makes contact. it is black with tarnish and dirt not allowing electricity to go thru. you need some sandpaper or a needle to scratch it clean till its shiny.


now that its its clean slide it back in gently,if you bent it a bit scraping off the crud bend it back to its original way. the engineers who made this were kind enough to make a slide hole so use a toothpick as shown to lock it back in place. you will hear a click when its in all the way.

now that its all together put back on the mechanism and make sure to have the contacts completely surrounded by solder like before. it anchors it to the board more securely than the plastic tabs. if you only use a little solder the switch will wobble and wont work.
if it still clicks redo the scraping or if the switch wobbles make sure the center part of the switch with the 2 strips is in its plastic housing all the way till you hear the click.
done this fix many times and should last till another 20 years of tarnish and crud accumulates on it again
third fix is still in the works and maybe you can help. alot of neo cd pads loose the clicking sound of its d-pad switch and stop functioning all together. there is a metal concave thingy,i think the technical name for it is a tactile metal dome:

here it is removed from the switch

once it goes flat the switch is dead or extremely hard to activate.
ive ordered multiple switches similar to it and made prototypes:

prototype worked but the click to press ratio was off so i resorted to buying tactile switches and harvest the metal from them as a replacement. there are none that have the exact same size but i found one that's 75% the size and its working but takes a bit more force to activate making the rhythm off a bit. to make it flawless i would have to replace all of the concave metal if they are working or not with the new ones to get it in rhythm. i also harvested the concave metal from nintendo 3DS and they didn't work at first being too weak but messed with it again and seems to be working at almost the same pressure as an original. i will continue testing and let you know the results later on.
fourth is an oddity. the protection inner shell is a weird material almost like bakelite than plastic. also it has unused pegs that can hold its laser:


was it supposed to have been there originally? or perhaps an entirely different laser mechanism was meant for it cancelled due to costs but the mold was already made. that inner shell shouldn't even be there. such mystery.
i didn't mention pot tweaking for weak lasers as anyone can do this or region switch as there are plenty of tuts on it. here my simple region mod done with a radioshack slide switch:

http://img.photobucket.com/albums/v238/jetbue7/IMG_20131001_134321_zps31e982ca.jpg
http://img.photobucket.com/albums/v238/jetbue7/IMG_20131001_134253_zps0ab75a22.jpg
i lost my notes on pot readings but will provide later on. if you have a weak laser just tweak the pot on the laser not the motherboard pots unless you suspect they have been changed.
update,found notes. i used a multimeter set to ohms at 200k. use the black led on the top prong of the pots and use the red to check the other 2 prongs. i say top as they are like a triangle. to lean what ohms your pot is for replacement put both black and red leds on the 2 bottom prongs and the reading is the full measure of how many ohms it has max. the mainboard pots have initials next to them probably indicating what they are. one has FG so i think its focus gain,TG tracking gain etc. you will see them when you take it apart. these are the readings for 2 units i had:
unit 1 pots
vr101 44.0 39.0
vr102 05.7 09.2
vr103 16.9 17.6
vr104 01.9 000
vr105 00.9 000
laser 17.2 04.5
unit 2 pots:
vr101 42.0 36.9
vr102 08.3 10.6
vr103 17.0 17.2
vr104 01.3 000
vr105 01.0 000
laser 14.9 06.0
if games don't load or take a while tweak the laser pot only shown here:

laser is a sharp H8147 i think,20 25 bucks on ebay.
the little blue pot. careful its fragile so use a small flat head screwdriver. you can take readings with it in the mechanism hooked up wont change the readings at all. same for taking pot readings from under the board where the 5 pots are.
http://img.photobucket.com/albums/v238/jetbue7/IMG_20131221_164350_zps919b4c5b.jpg
sometimes if the laser does read but has a hard time seeking and resetting after adjusting the laser ohm to like 20 or 25 then adjust the main board pots but as always remember what readings they were so if you have to you can set them back. usually i don't get to that point and just get a new laser.
forgot to ask,is there anyway to tell the difference between a USA and JP model? i found one where the owner has no idea where he got it. the metal jumper looks factory and semi clean but all the inside boards are stamped with this:


same on the motherboard.
even the ribbons look different from all the JP units ive seen:
http://img.photobucket.com/albums/v238/jetbue7/IMG_20131221_164203_zps9d167122.jpg
http://img.photobucket.com/albums/v238/jetbue7/IMG_20131221_164306_zps765fe1c9.jpg
http://img.photobucket.com/albums/v238/jetbue7/IMG_20131221_165452_zps8bf61f17.jpg
its serial is JA0042124
if anyone has info on how to tell them apart proof positive that would be most helpful.
hopefully il get a cdz and a front loader and provide fixes for these.
that's it. if you can add to it or link other threads that have past fixes as i cant find them. hopefully this will help many keep there neo cd's running for many years to come.
Last edited:


 Still, a pretty cool discovery nonetheless.