*Edit* I can do this mod for $65 shipped to your door. You would be responsible for shipping the Nomad to me. For $70 I will do the mod and also install a new screen cover.
I can also do the Battery mod in the next post for $70 shipped to your door. I won't need your Nomad for that mod.
Youtube video added.
http://www.youtube.com/watch?v=bCZ4oPixQwU
References for mods I have done:
Screen Mod :
Racketboy member jbltecnicspro.
Screen and Battery Mod :
DigitalPress member Oldskool
Digitalpress member MetalFRO.
The Retro League Host and BenHeck member nickerous:
Well I got tired of the crappy Nomad screen and rechargeable battery pack, so I modded my Nomad with a new 3.5" screen and a Lithium-Ion Batttery pack.
Here's how I did it :
First things first. Get rid of the old Lcd.
Open up the Nomad. You will need a security bit for the bottom/middle screw. After you open the Nomad , pull the circuit board up and you will see the Lcd. Pull it of and then pull of the lcd cable attached to the main board.

Now you just ruined your Nomad. Just kidding")
Here is the new Lcd we will be using :
http://www.dealextreme.com/details.dx/sku.20415
It is $50 shipped.
You can also find them on Ebay for around $35 shipped. Just be sure to get the same exact monitor. Other 3.5" on Ebay and from Dealextreme don't work with the Genesis and they are to thick to fit in the Nomad case.

When we take it apart it will look like this :

Now what you want to do is get out your hot glue gun and glue the new Lcd into place. Make sure you get it centered. be aware the Lcd hole on the Nomad is slightly slanted so the Lcd will be slightly slanted when mounted.

Now it's time to solder the wires necessary to power the screen and get video to it.
You will be soldering 4 wires. 2 grounds, power, and video. the 2 ground wires go to the same spot on the Lcd's board.

Here is where the wires will be soldered to the Nomad's board :

And some closeups :


After it is wired you will want to mount the Lcd's board on top of the Lcd. I put a small piece of paper between them to protect against shorts. You can then hot glue the 4 corners to hold it in place. :
You might also want to insulate the back of the board before putting the system back together to protect against any shorts from the system hitting the lcd board.

Now put the Nomad back together. Make sure the wires are crimped anywhere, or in the way of the buttons.
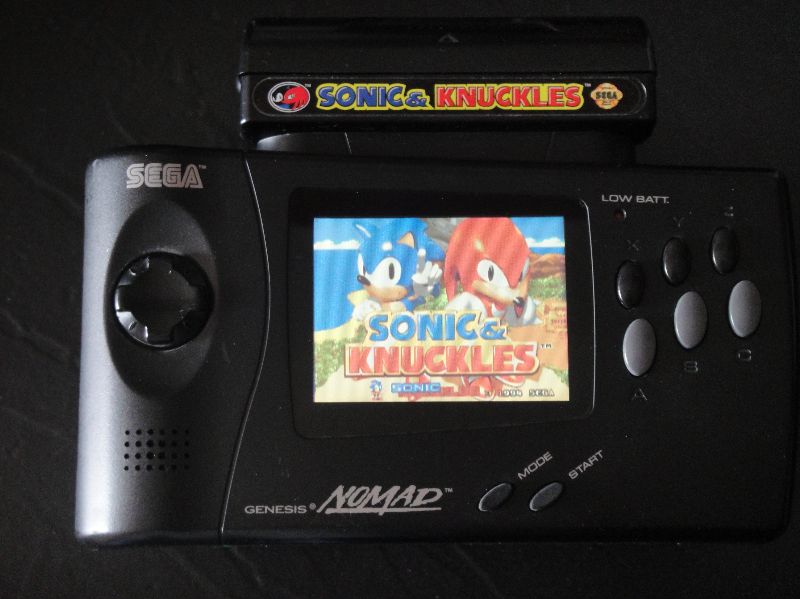
Plug it in and see the new Lcd in all it's glory.


Here's a pic of what the old screen looked like :
I can also do the Battery mod in the next post for $70 shipped to your door. I won't need your Nomad for that mod.
Youtube video added.
http://www.youtube.com/watch?v=bCZ4oPixQwU
References for mods I have done:
Screen Mod :
Racketboy member jbltecnicspro.
I got everything, and I'm very happy. Nice work! You can't tell the mod was done!
Screen and Battery Mod :
DigitalPress member Oldskool
Well I just got it today, looks awesome! I cannot believe the difference! I can actually play Sonic and see what the hell is going on. Thanks man! Thanks Jonjandran this thing looks AWESOME!! I expected it to be nice but DAMN. You can actually read the text in Phantasy Star IV, and the fast action in Sonic is no match for this screen! I recommend to ANYone with a Nomad to get this done.
Digitalpress member MetalFRO.
I had a chance to test it as well - thanks so much, I can't believe how clear that new screen is, and no residual blur!
The Retro League Host and BenHeck member nickerous:
Amazing difference in quality! The new screen makes it much easier to play the Nomad. Can't reccomend it enough. The battery mod allows the Nomad to be used as a true portable system. Who has the money for regular batteries to feed the unmodded Nomad? This solves that problem and allows me to cut the cord in regards to the wall adapter. Thanks again, Hailrazer!
Well I got tired of the crappy Nomad screen and rechargeable battery pack, so I modded my Nomad with a new 3.5" screen and a Lithium-Ion Batttery pack.
Here's how I did it :
First things first. Get rid of the old Lcd.
Open up the Nomad. You will need a security bit for the bottom/middle screw. After you open the Nomad , pull the circuit board up and you will see the Lcd. Pull it of and then pull of the lcd cable attached to the main board.
Now you just ruined your Nomad. Just kidding
Here is the new Lcd we will be using :
http://www.dealextreme.com/details.dx/sku.20415
It is $50 shipped.
You can also find them on Ebay for around $35 shipped. Just be sure to get the same exact monitor. Other 3.5" on Ebay and from Dealextreme don't work with the Genesis and they are to thick to fit in the Nomad case.
When we take it apart it will look like this :
Now what you want to do is get out your hot glue gun and glue the new Lcd into place. Make sure you get it centered. be aware the Lcd hole on the Nomad is slightly slanted so the Lcd will be slightly slanted when mounted.
Now it's time to solder the wires necessary to power the screen and get video to it.
You will be soldering 4 wires. 2 grounds, power, and video. the 2 ground wires go to the same spot on the Lcd's board.
Here is where the wires will be soldered to the Nomad's board :
And some closeups :
After it is wired you will want to mount the Lcd's board on top of the Lcd. I put a small piece of paper between them to protect against shorts. You can then hot glue the 4 corners to hold it in place. :
You might also want to insulate the back of the board before putting the system back together to protect against any shorts from the system hitting the lcd board.
Now put the Nomad back together. Make sure the wires are crimped anywhere, or in the way of the buttons.
Plug it in and see the new Lcd in all it's glory.
Here's a pic of what the old screen looked like :
Last edited:


